Documentation
Applications
Adding Fields to Applications
Build an application form for a program by adding fields to the application type. The application types are created automatically when a new program is added.
There are three steps to adding a field:
- Adding the field's data settings (this section)
- Configuring the display of the field on the application form (Managing Form Display)
- Configuring the display of the field when viewing an application (Managing Application Display)
For an example of the entire process, see the Getting Started section.
First, we must add the field's data settings at 'Manage Fields.'
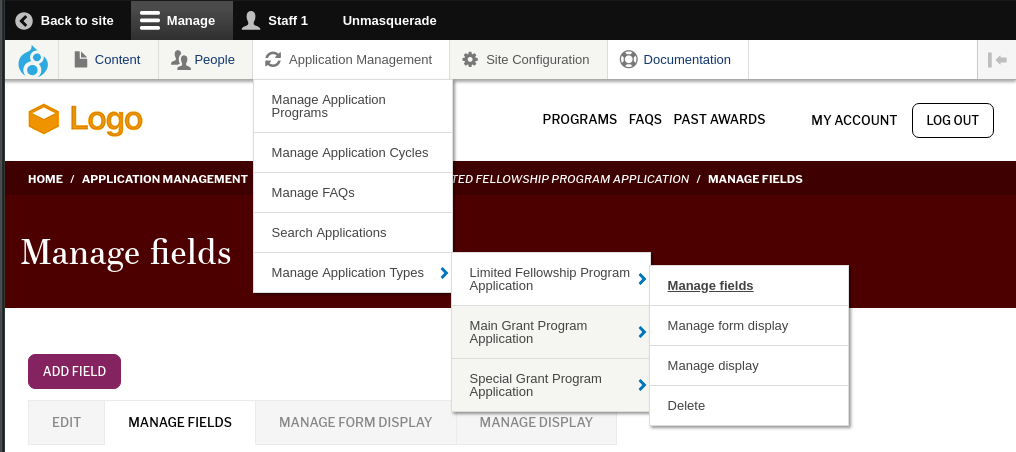
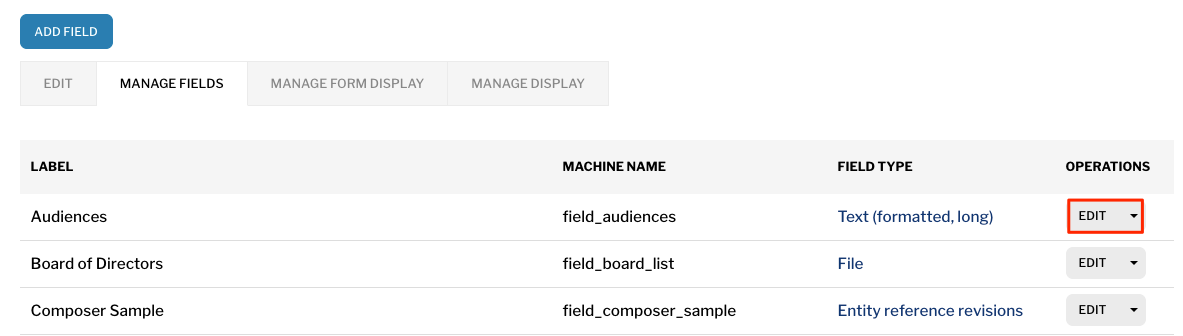
Go to Application Management > Manage Application Types > 'Application Type Name' > Manage Fields.
On the 'Manage fields' page you see all the fields on your application. Press the 'Add Field' button to add a new field. You can add a new field or reuse an existing field. Reusing a field can help you save time if you are collecting the same information on multiple application forms.
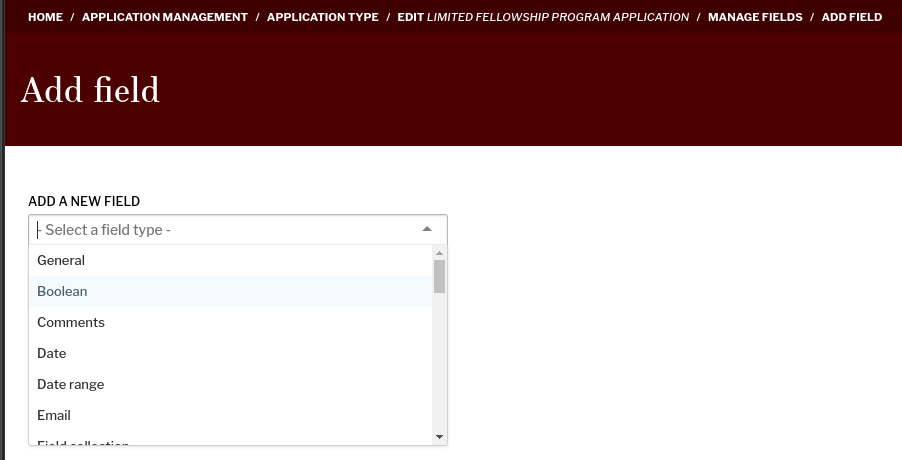
To Add a field, choose a field type for the type of data it will hold, enter in the label for the field, and press ‘Save and Continue’ to start configuring the Field Settings.
Field types
There are various types of fields you can add to an application form. You cannot change a field's type after you add it. The following are the most commonly used:
- General:
- Boolean: A single on/off checkbox field
- Date: A single date which may include a time
- Date range: A beginning and ending date
- Email: A text field that enforces a valid email address
- Link: A text field that enforces a valid URL. This can also be used to embed videos by pasting in a link to a third-party video.
- Number:
- Number (decimal): A field that enforces a valid decimal number, for example a dollar amount
- Number (integer): A field that enforces a valid integer number, e.g. 1, 2, 3
- Telephone number: A text field that enforces a valid phone number
- Reference:
- File: An upload field for uploading a file, such as a pdf or audio file
- Image: Like the file field, but optimized for image upload
- Other:
- Paragraph: A 'paragraph' allows you to set up a group of multiple fields which can repeat as a set.
- Text:
- List (text): A select list, radio buttons, or checkboxes to allow one or more options to be chosen
- Text (formatted, long): A large text area with a WYSIWYG
- Text (plain): A short text field
- Text (plain, long): A large text area with no WYSIWYG
Field Settings
Field settings options vary by the type of field. You can set field settings when adding a field, or later by clicking 'Edit' for a field on the Manage fields screen.
Some of the common field settings are:
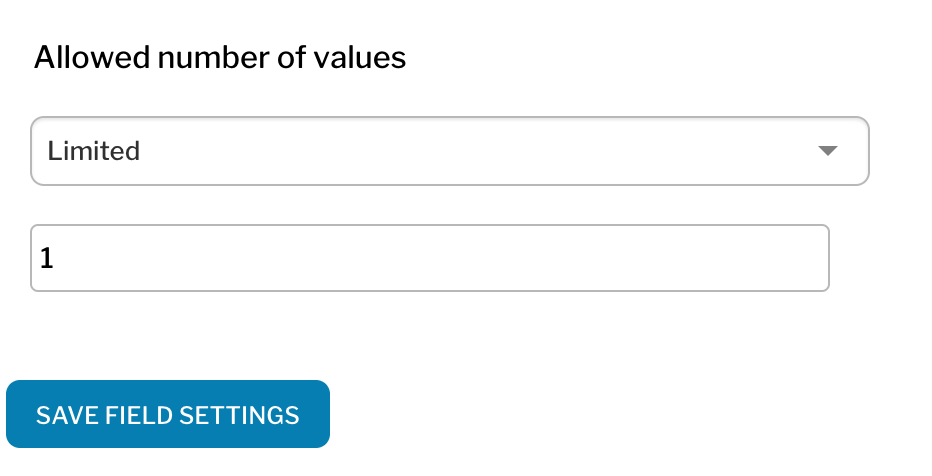
Allowed Number of Values
A field can be a multiple or single field (cardinality). For most field types, allowing Unlimited or a set number of values greater than 1 will result in an ‘Add another’ button on the application form. For example, if you want applicants to be able to upload up to 3 files in one file field, choose 3 for the allowed number of values.
If the field is a List (text) field, allowing unlimited values will allow the applicant to choose more than one option from the list (checkboxes). Allowing only 1 value will give you radios rather than checkboxes.
**Help Text **Text added to this field will be displayed on the application form with the current field and can be used to give the applicant more information about completing the field. You can include links in your help text to more information, e.g. to one of your FAQs.
Require for Submission
Checking this box will mean that the applicant will be required to submit a value for this field when they finalize their application by clicking ‘Submit Application’. Applicants are able to Save and Preview their applications before completing all required fields. Most fields you will want to require for application submission. You would not want to require that a single (boolean) checkbox was completed if its being unchecked was valid.
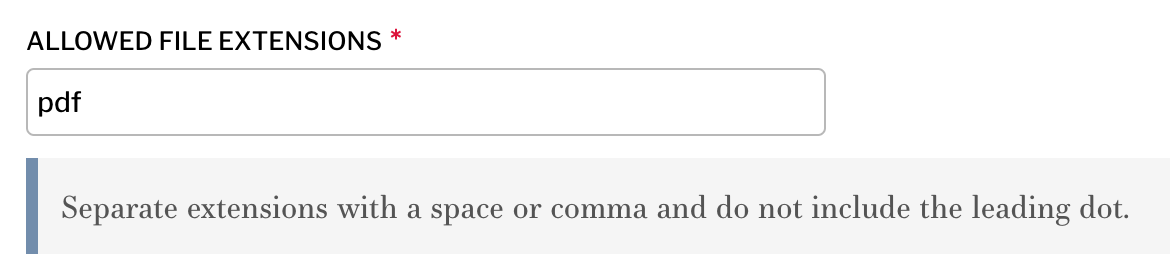
Allowed file extensions
This is a setting for file and image fields to set what applicants may upload. It's a good idea to require pdfs for documents rather than allowing Word documents, as this will standardize your applications and allow for use in the PDF export functionality in ApplyCycle.
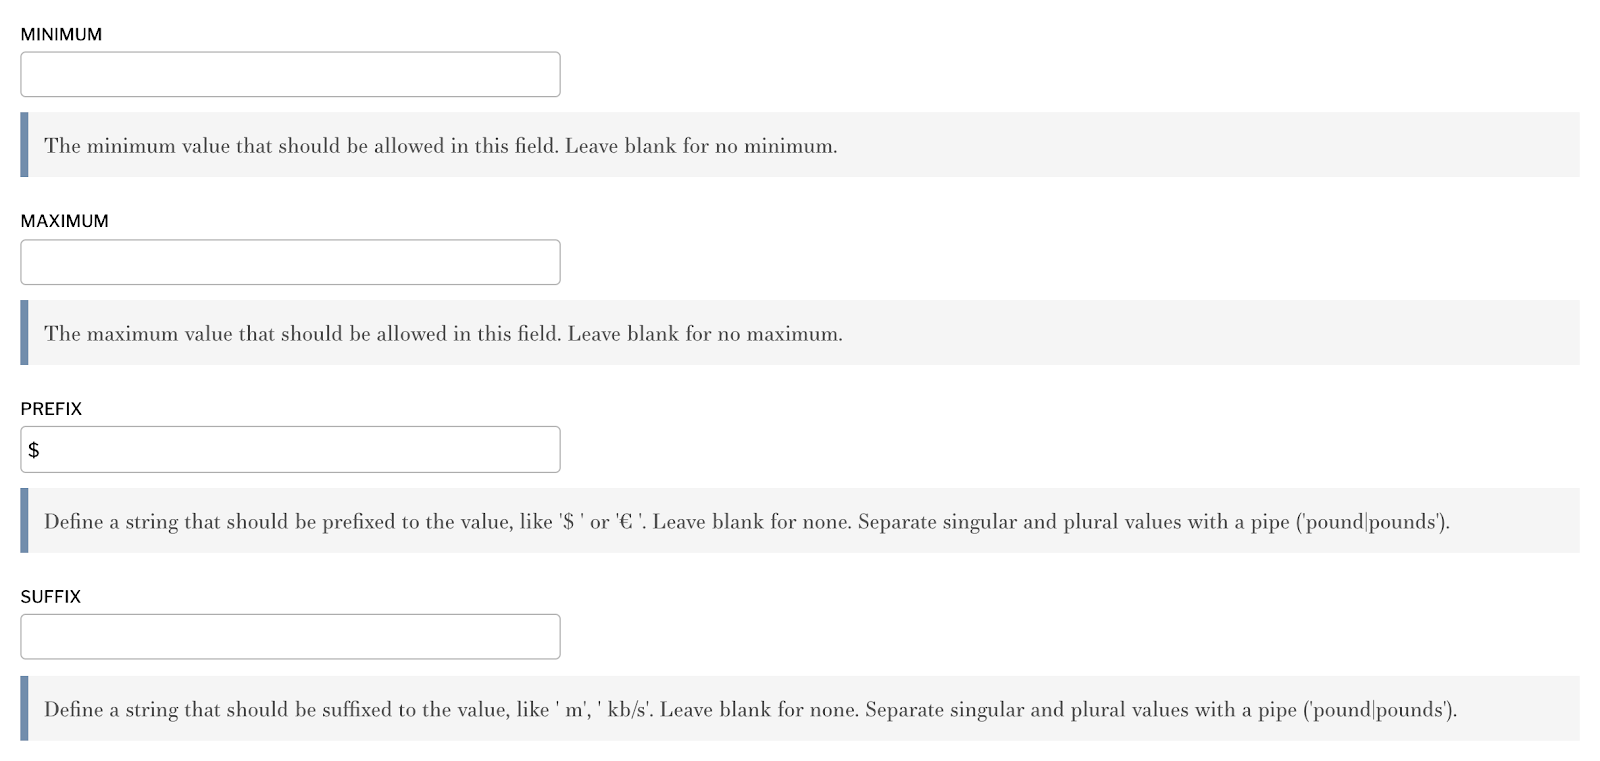
Number settings
You can configure a number field to enforce a minimum and/or maximum allowed value. You can also use prefixes and suffixes, for example use a $ prefix for a money field to help applicants understand that they should not enter their own dollar sign.
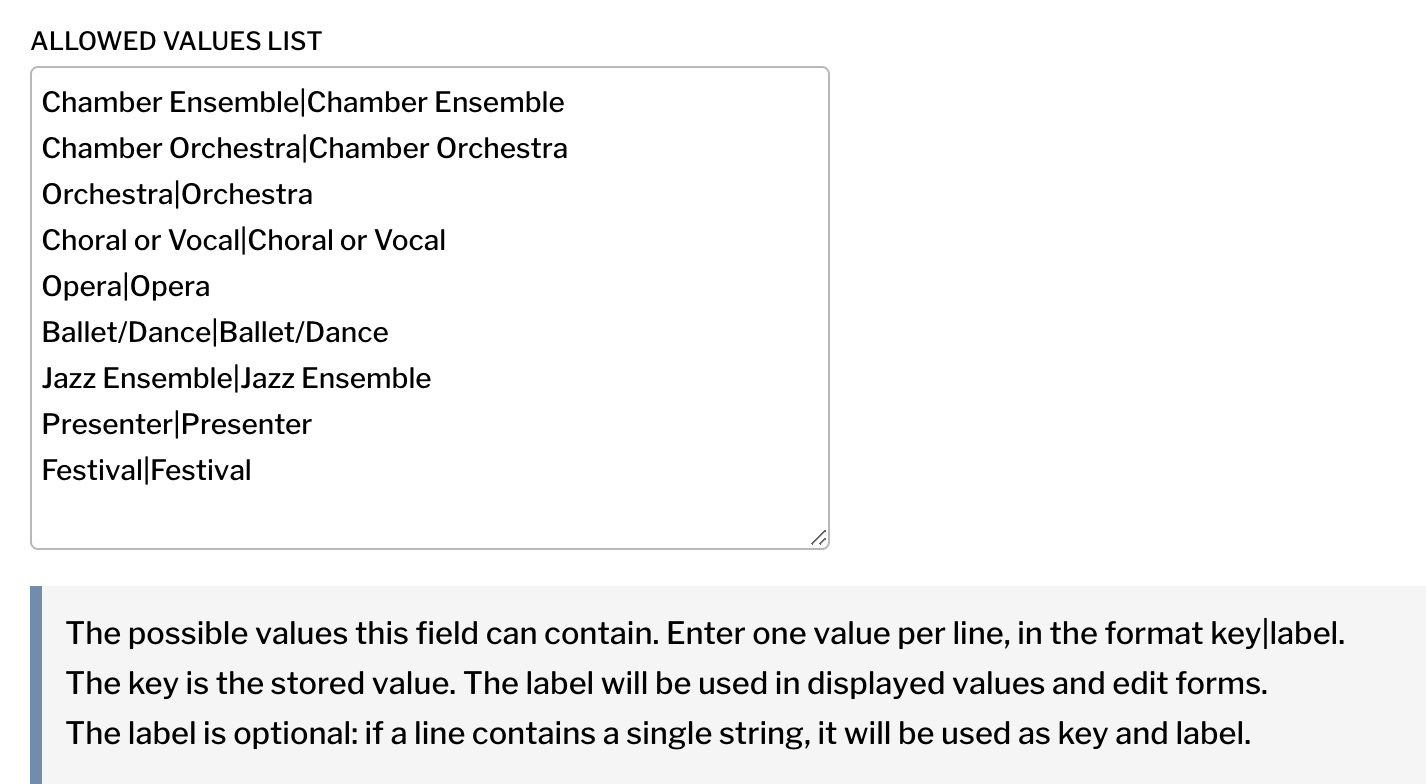
Allowed Values List
The Text(list) field type creates a select list or checkboxes/radio buttons. It needs at least two allowed values for applicants to choose from. These get entered in as 'key | label' pairs, using the ‘pipe’ character: |. The labels are what appear on the form. The keys are what will be stored in the database. Usually the keys and labels will be the same (you can simply enter in the labels and skip the keys). The reason they are different is to allow you to change the labels without messing up existing applications. For example if in the future I want to change the option ‘Choral or Vocal’ to ‘Vocal or Choral’, I change that line to be “Choral or Vocal|Vocal or Choral”. This way it will now say ‘Vocal or Choral’ (label) on applications but in the database the old and new data is stored consistently (as 'Choral or Vocal').
Paragraph Type Fields
'Paragraph' fields allow for a group of fields to be repeated multiple times in an application. For example, if you wanted to collect the School Name, Years attended, and Degrees Received for every school an applicant had attended, you could make a 'Paragraph' for 'School Attended' containing those fields, then add a 'Paragraph field' to the application allowing 'School Attended' to be filled in unlimited times.
Add a new Paragraph Type at Site Configuration > Paragraph Management then click on the ‘Add Paragraph Type’ button. Add fields and set displays on the paragraph type in a similar fashion to an application type. Once you have finished setting up your new paragraph type then go back to the Manage Fields page for your application type. Now add a new Paragraph type field and select which paragraph type to use in the field settings.
Previewing Your Application
Editors can preview an application form even when there is no active cycle. Go to /application/add ('Create an Application' under Application Management menu) to find your applications. If you create test applications you want to delete, you can find them on the 'Search Applications' page.
Changing Existing Fields
You can change the label, help text, and other settings of your fields. Go to the Manage Fields page for an application type (see Adding Fields to Applications for details on accessing this page). From the Manage Fields page, you can click the link to ‘Edit’ any of the existing fields which will take you to the Field Settings form.
Removing Fields
Once you have real applications on your site, you should generally not delete any fields as it will cause data loss for your past applications. Instead, if you no longer want to collect data for a field, you can hide it on the 'Manage Form Display' settings. You can continue displaying the field (so that it appears on older applications), but simply no longer collect it.
Embedded Fields (e.g. YouTube videos)
OEmbed fields should be used when media will be embedded or referenced from an outside source such as Youtube.
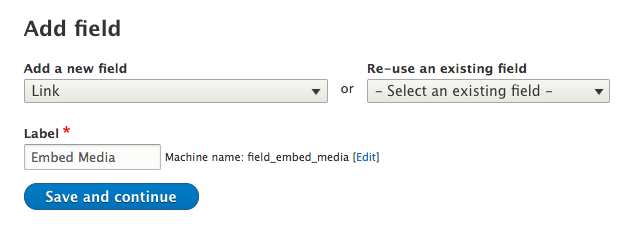
To add an OEmbed field, add a field of type 'Link' and set its Formatter to 'Oembed link formatter':
- Go to Application Management > Application types > [Name of application type] > Manage fields.
- Click + Add field.
- For the Field Type, select 'Link', and enter a Label name. Click 'Save and continue'.
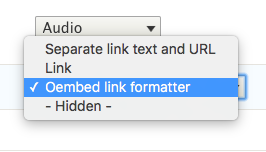
- For 'Allowed Link Type' choose 'External Links Only.'
- Go to Application Management > Application types > [Name of application type] > Manage display.
- Select Oembed link formatter from the Format dropdown.
- Click Save.
You can find a list of supported services users can embed at https://noembed.com/
Audio Fields
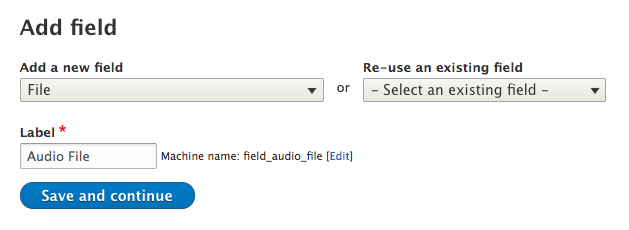
To add an audio field to an application, create a field of type 'File' and display it with a Formatter of 'Audio':
- Go to Application Management > Application types > [Name of application type] > Manage fields.
- Click + Add field.
- In the Add a new field dropdown, select File, and enter a Label name. Click Save and continue.
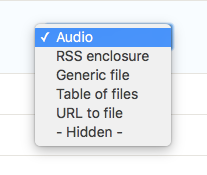
- In Allowed file extensions, enter the audio file formats you wish to accept in the application. Make sure that you are using file formats that are supported in the largest number of browsers.
- Go to Application Management > Application types > [Name of application type] > Manage display.
- Select Audio from the Format dropdown.
- Click Save.
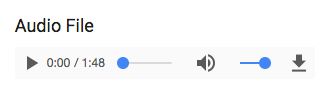
Note: You can verify that your file format configuration is correct by creating a new application and uploading a supported audio file. An audio player will appear on the saved application page.